Follow along with me as I show you step by step how I decorate my trees. Each tree has a different theme and different ornaments, but the steps generally stay the same. I finally have tree decorating down to a great formula that works for me. I hope it can help you out too.
This is the first year I am using a flocked tree. I LOVE IT!!!! I have always wanted one and I finally took the plunge and invested in one. I decided to go with the woodsy, rustic theme. I had already collected the ornaments for the tree a while back. I was just waiting to find the right tree. Being patient was hard, but I found my tree at Balsam Hill. I am not affiliated with Balsam Hill, but I will say I will always buy their trees. I was able to set it up from start to finish by myself. It was easy and it looks ahhh-mazing. It was everything I had hoped for in a flocked tree and they have my business the next time I need to invest in another tree.
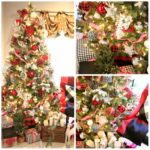
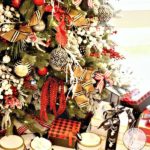
7 1/2 FOOT PERFECTLY PLAID TREE– This tree in my kitchen, is one I’ve changed this year. I usually do it red and green, but I was excited to change the colors and theme a little. Here are the steps I took in order when decorating this tree. I will also list the materials and where I got them from incase you are interested in this look.


- Place frosted greenery dispersed throughout the tree to give it the look of a real tree. It also lightens up the tree.
- Add all berries, sprigs, and twigs next. This layer adds a lot of texture to the tree. It also fills in the sparse spots of the tree.
- Adding your garland or ribbon is the next step. On this tree, I decided to wind the ribbon around the tree in a messy in and out pattern. Wired ribbon is easier to manipulate.
- The big ornaments come next. Place the bigger ornaments (pinecones, mercury glass balls, and larger ornaments) next. Try to place the ornaments in the holes and layer from the middle out.
- Use the smaller and clip on ornaments last. Fill in where you see bare spots. Try to mix colors, patterns and shapes throughout the tree.
- Stand back and move things around as you see fit.
The materials on this tree are:
- frosted greenery, berry sprigs, antler sprigs (Michaels)
- Red and white striped ribbon (Michaels)
- Black bulbs (Dillards last year)
- Red and Black Buffalo check ornament (Pottery Barn)
- birch wood stars and mercury glass ornaments (Pottery Barn)
- Black and Red Reindeer (Pottery Barn)


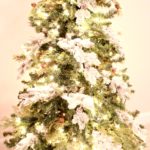
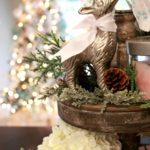
7 1/2 FOOT FLOCKED TREE/BALSAM HILL– This tree is in my library this year. I love it so much that I think I will put it in a more prominent place next year so I can look at it all the time. I had already gathered the ornaments for this tree way before I actually had the tree. The ornaments give this tree a log cabin type feel.
- Place frosted twigs in places where you see holes.
- Weave Pom pom garland around tree starting at the top.
- Place ribbon on the tree starting at the top. Weave in and out using a wired ribbon for easier use.
- Place Noel saying on the tree.
- Place biggest ornaments on the tree like the glittered pinecones and the large houses. Most of these will be from the middle toward the bottom.
- Finish up with smaller ornaments like the woodland animals.

The materials on this tree are:
- Brown Velvet Ribbon (Dillards – last year)
- Most woodland ornaments from Pier 1, Kohls and Pottery Barn
- Pom Pom Garland (ETSY)
- Frosted Twigs (Michaels)


9′ WINTER WONDERLAND TREE- This tree has all white ornaments on it with silver and clear accents. This room is done with all things to do with winter. This is my mom’s favorite tree each year.
- Put in the twigs with the little white balls.
- Put in the silver leaf picks.
- Put on the icy picks.
- Weave the silver wried ribbon on the tree. This is a new ribbon I bought for this year. I didn’t like the one I had been using. I love the way this ribbon made the tree look. The other one I used last year was transparent and I didn’t like the final look.
- Add the big clip on flowers.
- Put on the large ornament.
- Add the small ornaments.
- Fill in with the the transparent stars and icicles.

Materials are:
- White ball picks (Michaels)
- silver leave picks (Michaels)
- Icy Picks (Michaels)
- Silver Flower clip on (Michaels)
- Gray wired ribbon (Michaels)
- large white ornaments (Pier 1)
- smaller white ornaments (assortment over the years)


I hope you got some ideas on the format of how I decorate my trees. I tried to go with items I had already purchased, but there were several items I added to my collection this year. I always start at Michaels and see if they have what I’m looking for before I head to a department store. I also like things that not everyone else is going to have. Local boutiques and smaller stores may have decorations that fit with your motif. Don’t overlook those stores either. I hope you are checking things off your to do list as Christmas is almost here. Leave a comment below about how you will spend your holiday this year.
Yours Truly,
Jenn


Thanks for sharing your step-by-step process, Jenn! Looking at my tree right now I see so many empty spaces and I never would have thought to add filler greenery without your suggestion! Looks like I’ll be heading to Michael’s very soon 😉
xo – Michelle
http://www.borncreativeblog.com
I’m so glad you were able to get a couple tips from this post Michelle. It took me so many years to get to where I actually liked the look of my trees. Now it is so fun to experiment and play around with the ornaments I own. We bloggers really should own stock in Michaels. I’m there way too much.
Jenn
I love your trees and appreciate the advice. Am wondering how many of things you need? I know repetition is important, but does that mean 3, 7, 10??? What about different shapes, colors, etc. I love changing things up each year too, but it always takes me awhile and lots of trial and error! My tree is lacking something!
Linda,
I’m so glad you like the trees. It has taken me years to perfect my tree decorating and you’re right it takes a lot of stuff. I have been collecting all of this over the years. I find that my trees look best when I have a LOT of tree fillers added in the beginning stages. Tomorrow I will be posting the pictures and break down of how I decorated my tree. This should help you get a feel for how much I use to achieve that look. At the end of that post if you still have questions let me know.
XO,
Jenn